Model 141 trigger job.

ShadeTree

Handloader
Mar 6, 2017
3,518
3,025
The extra time off right now is spurring me to take care of a few things that have been on the back burner until now.

Got a Remington 141 in 35 Remington I really like but the trigger was super heavy, I didn't check it prior but I'm guessing at least 8 lbs. I felt like it was getting worse the last few times I shot it, but that might of just been in my head as when I took it apart I seen nothing in the way of corrosion or anything that would've caused it to be any different.

Quite a project but in the end well worth it as the trigger is now so much better. Plus I learned new information as it relates to this particular model rifle.

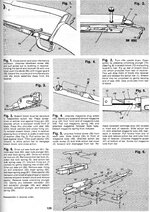
Completely disassembled the bolt to get at the sear face, and the firing pin face the sear notch latches over.

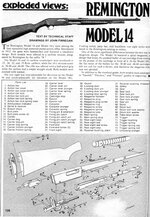
The level of craftsmanship and tight tolerances of all the intricate parts in some of these old rifles never ceases to amaze me. Every piece was milled back then. Stamped parts were not yet part of rifle manufacturing process, and was at a time when they would've been scoffed at had they been. This particular rifle appears to be a 1936 model.

Pure quality throughout. Case hardened internal parts, complicated ingenious designs that had to be very time consuming to produce. Just a Remington pump rifle, but to produce an exact copy today using the same quality manufacturing of all milled parts, would cost thousands of dollars. Even the loading gate on this rifle is case hardened. Didn't need to be, but another A+ for doing so.

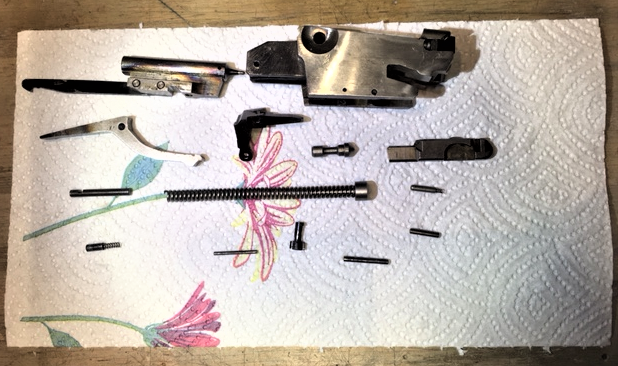
Anyways here's the disassembled bolt with the parts cleaned up after the sear and firing pin face work. Took everything out but the extractor, which I did after the fact and discovered I should find a new extractor spring to replace it before the upcoming hunting season.


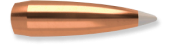
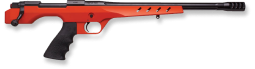
Here's a pic of the old rifle. Fun rifle to shoot and has been very accurate with factory Remington 200 gr cor lokts. Hope to test the effectiveness of a 35 Remington on a whitetail with this rifle soon.

 
P.S. All I did like I generally do to any older trigger, is lightly hand sand with 320 initially to remove any tiny burrs or imperfections on the contact areas that I can see using a jewelers glass. Lot of working it lightly, then checking, and repeating until it's smoothed out.

I then follow up with 400 grit (didn't have that for this), then 600 grit. If I see no burrs or imperfections I go right to 600 to polish. All by hand with no backer for the sandpaper, you don't want to go at it heavy.

If you do your job well enough with 600 to polish out any scratches left from the heavier grit, then a light buffing with polishing compound after words will make it shine like a mirror.

Always is satisfying to see and feel how much weight can be removed from a trigger by this simple process. All you're doing is lowering the lateral surface tension between the 2 opposing parts. I don't mess with the springs at all or alter the sear height on an older factory gun like this. Trigger is breaking just under 5 lbs, but honestly feels more like 3.5 lbs. Huge improvement. Feeling better than what they are is often the case when you get the surfaces really polished and smooth.
 
Thanks for sharing your detailed procedure. These rifles are great deer woods guns. Your going to like the results of the 35 on deer as well. Kept inside their range it is a good round. Dan.
 
Nice work ST. That classic old rifle sure looks great and having a trigger smooth as butter makes it all the better. That big 'ol 35 Cal 200 gr SPCL bullet will leak a lot of blood out of a big buck when you put it in the vitals and meat loss will be minimal. A red wool coat would be appropriate for your hunt this fall!

JD338
 
wvbuckbuster":1n9hhdly said:
Thanks for sharing your detailed procedure. These rifles are great deer woods guns. Your going to like the results of the 35 on deer as well. Kept inside their range it is a good round. Dan.

Dan been itching for a while now to test this 35 Rem out on deer. Hopefully soon.


JD338":1n9hhdly said:
Nice work ST. That classic old rifle sure looks great and having a trigger smooth as butter makes it all the better. That big 'ol 35 Cal 200 gr SPCL bullet will leak a lot of blood out of a big buck when you put it in the vitals and meat loss will be minimal. A red wool coat would be appropriate for your hunt this fall!

JD338

JD, I'm not old enough to have ever worn a wool plaid coat for hunting, but I am old enough to have seen older gents wearing them during hunting season.

One hunt in particular I haven't forgotten was a cold crisp afternoon and I was sitting in a homemade ladder stand at the time. Heard a ruckus coming and several deer crossed the hollow behind me and came up past me. Little while later crunch, crunch, crunch, here come an older gent in a red wool rich coat, down into the hollow from the direction the deer had come from, looked up at me and waved, I waved back and on he went up the hollow. That process repeated numerous times that afternoon. Deer would come across the hollow, man in a red wool hunting coat would come 5-10 minutes later into the hollow, wave and disappear up the hollow. Don't know who he was stirring around for, but I was reaping some of the benefits. As I recall I seen 19 different deer off that gent that afternoon. All doe.
 
That's a great story ST. Sounds like #20 snuck out the back door.

JD338
 
Does anyone know where to find a video of the complete breech block disassembly and reassembly?
 
I still have my fathers red and black plaid hunting coat that I also wore till I outgrew it. Though we both had plaid Woolrich shirts the coat is a King sportswear hunting coat with game pocket. That coat kept my warm and dry on lots of cold wet days.
Dad also had a red plaid dress Woolrich jacket that my son latched on to.
 
Does anyone know where to find a video of the complete breech block disassembly and reassembly?

Are you talking removing the breech block and re-installing it, or complete dissasembly like I have pictured? Either way, don't know if there's a video.

Too much to get into just off of memory on dissasembly, but if you go slow and pay attention it isn't that hard. Re-installing the removed breech block is a pain until you figure it out..............it's pretty simple once you realize what needs done, and that I can explain off of memory.

On the left side of the breech block, opposite the push button action release, is a slide bar. When the breech block is removed that slide bar is under spring tension, and with the breech block removed it is no longer hindered and the spring pushes the slide bar to the rear. If you look, that slide bar when in the rear position is partially covering a slot in the block. Push the slide bar forward, and the slot in the breech block is accessible.

Install the breech block..........bring pump to the rear to where the breech block is engaged...........push that slide bar forward and it allows the pump assembly to come farther to the rear over the breech block and locks into place. I install it with the rifle turned bottom up.

Easy peazy once you realize how it works. I can break that rifle down and reassemble in minutes. But without sliding that bar forward as the last step on the breech block installment, it's next to, if not impossible. And will make you call it some words neither Momma or Jesus would like.
 
I was talking about completely disassembling and reassembling the breech block like you have pictured. Although the information you posted about reinstalling is helpful and much needed for me to complete the rifle assembly. I really appreciate the help. If there is a video of the breech block assembly it would really help. I have found instructs that are really thorough that I am currently using.
 
These are the instructions I am using.
 

Attachments

  • Model 14 American Rifleman disassembly (clean copy) p2.JPG
    Model 14 American Rifleman disassembly (clean copy) p2.JPG
    2.8 MB · Views: 4
  • Model 14 American Rifleman disassembly (clean copy) p1.JPG
    Model 14 American Rifleman disassembly (clean copy) p1.JPG
    2 MB · Views: 4
Wish I could help you out more, but there's no way I can recount the steps and tricks of what made it go easier on re-assembly of the stripped-down breech block, off of my memory. Looks like step 6 of the instructions you posted are very detailed on the breech block, it's just a lot of info to take in. Makes it seem more complicated than what it actually is in practice. I didn't think it was too bad even though there's quite a few pieces in that block.

If you have the breech block out and need it stripped-down and cleaned up.........I can't imagine if you'd take just that piece to a gunsmith, that they would charge much. Especially one that's done one before. I'm not a gunsmith by no means and it wasn't that bad from what I recall, but in general those kinds of things don't intimidate me. If it's a big deal to you, there's no shame in that, and would be well worth the couple bucks to let a smith break it down and reassemble for you.
 
Back
Top