Say a prayer.

ShadeTree

Handloader
Mar 6, 2017
3,518
3,025
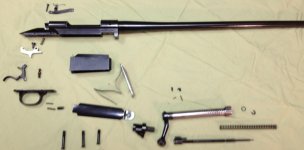
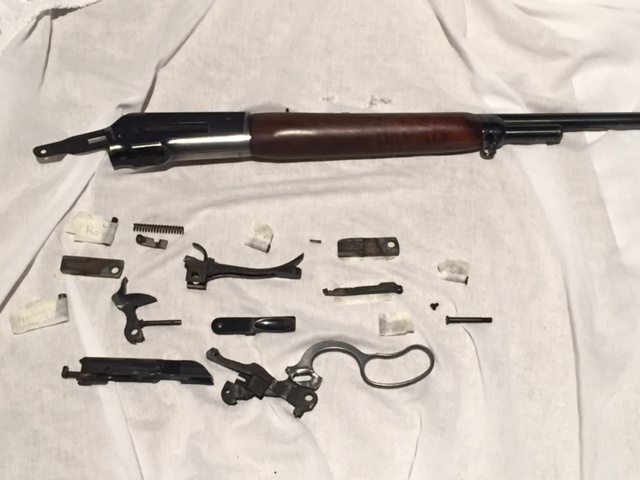
I might need it. Didn't relish doing it but it needed done so I tore down Pop's model 71 so I can fully inspect and clean the chamber. Was getting spiking velocities and when I checked, bullets went in tight on fired cases leading me to believe there was carbon build up in the neck area of the chamber. Turns out that was well founded, it is without a doubt carbon fouled in that area.

Levers, pins, springs, these guns are certainly not simple and not a bolt action to work on. Somewhat of a jigsaw puzzle and I felt like I might be in over my head, but you can't accomplish something if you don't try. I labeled all parts as well as made note if they go back in left to right, right to left, etc.

I wont breathe easy until it's all back together and functioning properly.

 
You should do alright! Good on you for making the attempt.

Might be a good idea to put an OLD gunsmith on speed dial though- they get similar "parts in a bin" projects though the door all the time.

When I was a young enthusiast, I had one really take the time and help me put my S&W M10 back in action after taking it apart for a DIY trigger job.
 
Holy smokes! Now that is stripped!

Good luck and a prayer sent putting that sucker back together.
 
I looked at your picture and had a good laugh -- nice little blast from my past. I worked at a friend's custom aluminum jet boat manufacturing business one winter and spring a number of years ago during my slow time. We had just finished a boat (28' twin engine enclosed cab) and during the test drive the company owner had noticed a slight vibration. We got back to the dock and he told me to replace the port impeller shaft the next day. First time I had ever done that. Got the shaft out the next morning, and after removing the lock nut realized there's a bunch of non-intuitive looking parts and pieces in the form of impellers, shims, bushings, collars, seals, etc... that are all very subtly different. I recognized my limitations at putting that thing back together correctly, so VERY CAREFULLY set every piece on a long workbench, in order, oriented in the right direction. Pretty pleased with myself, I went to grab the replacement shaft and a fresh cup of coffee for the next phase, and came back to the company owner sitting at my bench picking up parts, inspecting them, and sitting them back down at random. We chatted a few minutes and before he got up to leave I told him he needed to help me get everything back on the shaft since he'd messed up my "system". He laughed at me, said no problem as he'd done it hundreds of times. 3 hrs later we finally got the right combo. Remains one of my favorite boat shop memories -- frustrating as hell, but some very cool time spend with a very cool gentleman.

That said, "prayers" sent your way.
 
Scotty, all that was necessary to remove the bolt. The majority of those pieces had to be removed in order to allow removal of the bottom tang. Once the bottom tang was removed the last 2 pieces were the finger lever and bolt attached together. With the bottom tang removed it allowed those to be slid to the rear farther than normal which exposed a pin in the bolt that could be driven out allowing the 2 to be separated and come out.

It's a little daunting, but there is a way to properly assemble it back together as they were every time they went out the door. Just hope I don't get stumped. I'll know in about a week.
 
Oh lawd! Make sure the floor is clean so you can find any dropped pieces, flashlight laid flat on the floor will help. I’d still be sitting there wondering where these extra 2 pieces go.......


Sent from my iPhone using Tapatalk
 
Dwh7271":27v5l98v said:


That second link could come in handy if I get stumped! I'm gonna try getting it back together on my own, learned a long time ago to take my time, think things through, and not force things. If I can't get it that $6.99 will be cheap money well spent.
 
You will get it just don’t take to long before you forget it. Mine was in for Cerkote a couple weeks and by taking pictures of it helped putting it back together. Good Luck (y)
 

Attachments

  • E45F3916-9BF0-4C76-8D30-7344B688151C.jpeg
    E45F3916-9BF0-4C76-8D30-7344B688151C.jpeg
    599.1 KB · Views: 826
Good luck Shadtree you'll do fine! I know how it feels though. I took my colt python that was passed down to me. Took sidepate and all the guts out. To give it a detail clean clean. I managed to get it back together pretty easy, but I'd being lying if I said the anxiety wasnt through the roof! Lol.

Sent from my SM-N960U using Tapatalk
 
Just don’t force anything and you should be good. I might know someone/somewhere if you can’t get it figured out. But,you’ll be fine.
 
John Browning was a lover of many, many parts in everything he invented! ha. The horror stories around here are the guys who "tried" to take apart/put back together their BLRs. Its tough to get the "timing" right on that rack & pinion system, ha. Good call on the carbon buildup though!

40 years ago, An old neighbor friend ( retired welder) lived near our deer camp. He had a homestead. He hunted year round, was a woods roamer, explorer, etc and used a Remington 742 in 6mm Remington, iron sights. Pigs/coyotes/deer/varmints, he was a shooter! I don't know how much ammo he went through, (Remington 100gr corlokts factory loads) but it was in the case load figures! He finally sold it to another friend when it "was shot out" and became inaccurate. The old guy was sick and didn't hunt/shoot anymore, needed the money and my other friend just wanted it because of its history. Indeed, looking at the bore there was no rifling visible. He took it to a smith in Houston and the guy cleaned it all out, changed a few parts ( you could get Mod 742 parts then, it was popular in that part of Texas) . It went back to shooting spot on, ha! It was just fouled up deluxe. The old guy just sprayed it with WD40 after a day in the rain and wipe it down, sprayed a piece of flannel on a homemade pull through down the bore! That's it. :)
 
Dwh7271":3t4urguw said:
You get it back together?


Didn't attempt it yet. The little bit I worked at the carbon it proved to be pretty tough to remove, so rather than fighting it and boring and brushing, I've had it soaking with Hoppe's the last few days trying to let the solvent loosen some of it up. If that doesn't seem to be getting anywhere I'll try something else.
 
Dwh7271":1114mqns said:
Carb cleaner or brake cleaner work well fwiw.


I left the chamber area soak in hoppe's for 4 days. Without a bore scope it's hard to see if it's all out after cleaning, but the .410 bore brush sure seems to turn and pull out of the neck and throat area a lot easier now.

Just to be sure I took your advice and sprayed some carb cleaner into the chamber. Then I took a .410 bore mop saturated with carb cleaner and have it jammed into the neck area of the chamber. I'll let it sit for a day and clean the neck and throat area with the bore brush again.

I might call some of the local gun smiths and see if they have a bore scope. As complicated as this was to get apart and I'm sure get back together, I don't want to put it together until I know I got all that carbon out!
 
There are those who swear by Kroil oil for carbon. I have no experience with it myself. Dads 7MAG was probably pretty carboned up. Wipe out was not a miracle cure for that either. Still getting a lot of carbon out of that when I clean it. I bet there's half a can through it by now..... Tough stuff. CL
 
Dwh7271":32s32c4c said:
Carb cleaner or brake cleaner work well fwiw.
Yep. Just use in a WELL VENTILATED area. That stuff will kill ya. We used brake parts cleaner regularly in the armory when I was in the military for the old M-60’s. Hosed down good with brake parts cleaner or carb cleaner with a follow up of WD-40.
 
Just an update. Took it to a smith who bore scoped it and said he just sees a very small carbon ring right up where the rifling starts, so I got the most of it. Gonna soak it in hoppe's again and work at that last little bit.

While I had it this far apart I figured I might as well do it right as it's never ever been torn apart, and might not ever be to this level again. So I stripped the bolt by driving out 1 small pin to get the firing pin out, and another to remove the extractor. Was gunked up some in there and even some rust at places. Got that all cleaned up and lightly oiled and put back together.

I'm planning on piece by piece cleaning and reassembling whenever I got time to work at it. Will take as much time as it takes to go slow and figure out how things go together. The bolt went back together way easier than it came apart so maybe the rest will go that way.
 
Back
Top