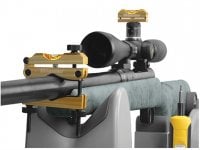
Leveling a Scope

filmjunkie4ever

Handloader
May 4, 2011
1,964
1,352
What method do you guys use to level your scope when installing a new one?

I cannot seem to get my VX-2 on "Old Betsy" to level out. Maybe I am being too much of a perfectionist but don't want a canted scope.

I bought a set of Wheeler levels and that has worked with other guns but it seems I either cant get a level spot on my rifle or that the scope caps are rounded rather than the older flat style and therefore when the levels say I should be straight with the world, it is canted as can be.

Any advice?

Thanks -

Dale
 
I use one of these digital angle gauges made for wood working blade angles and various "L" shaped metal brackets inserted along the bolt slides or flat spots on the action and "zero the gauge. Then I put it on the scope's turret (mine are flat) and go either way till it says "0" again. It's worked really well for my needs.


4eaef7630fee1d49a3de1c4208897c47.jpg
 
I use a level on the scope mount or a flat spot on the action and then I use a level that clamps on the barrel. Once they are both in sync then I mount the scope and true the crosshairs with a plumb bob while keeping the rifle level.
 
OK. I'll show off my ignorance here. In the system pictured above, what keeps the rifle from being canted? Seems to me the level can read leveled without the gizmo being clamped at 12:00 on the barrel,so to speak. What don't I understand? CL
 
Sounds like I am being too picky perhaps. I don't plan shooting more than about 400 yards in absolutely perfect conditions so I don't think it would be a huge problem if its a little canted. I just need to stop being so picky I guess. Thanks for the input fellas.

Anyone else?

Dale
 
I use one of these on the front of the scope:
http://www.brownells.com/gunsmith-t...ing-vertical-reticle-instrument-prod6097.aspx

and one of the levels from the level-level-level kit on top of the turret of the scope. In that way I avoid having to find a level spot on the action.

A couple of comments -

the rings and bases you use can make a difference.
Windage-adjustable bases need to be centered as best possible.
The order and amount of torquing the ring screws can tip your scope in the rings.
And, how you hold your rifle can make your scope "seem" tilted even when it's not.

PS. There are free levels that come as Apps for your smartphone. I've used those also, and they can work extremely well.
 
cloverleaf":u76v38gx said:
OK. I'll show off my ignorance here. In the system pictured above, what keeps the rifle from being canted? Seems to me the level can read leveled without the gizmo being clamped at 12:00 on the barrel,so to speak. What don't I understand? CL

3 STEP METHOD TROY

You level the rifle with the small level on the flat part of receiver or the scope base attatched. Then you level the level on the barrel. Then you go off level of barrel and level the scope.
 
If you have a picatinny rail mount it's super easy! Most scopes have a flat spot on the bottom of the scope under the elevation dial. Rail is flat....bottom of scope is flat.....put a set of feeler gauges between the two and tighten rings, and you're done!


Sent from my iPhone using Tapatalk
 
Believe it or not some scopes crosshairs aren't level with the scope. That is why I use a plumb bob. The best way is to actually check tracking with a level line if it's a scope that will be dialed up.
 
Agreed. I like to check mine after mounting by shooting a group then dialing about 10 mils and repeat. Checking for straight up and down tracking as well as appropriate distance of travel. But if the reticle isn't level with the scope, for me at least, I figure I paid lots of money for a high end scope that should be perfect and it would be sent back to the manufacturer to be fixed or replaced. So far haven't had to do that.....


Sent from my iPhone using Tapatalk
 
...I use a cheap magnetic level on the bottom 1/2 of the rings, clamp the rifle in my cleaning rest 'level', use a plumb bob to to set the scope. Allows you to slide the scope to set your eye relief before you tighten it down, & check to make sure you haven't canted the scope while you're torquing it...
 
FOTIS":8l5c1p4k said:
cloverleaf":8l5c1p4k said:
OK. I'll show off my ignorance here. In the system pictured above, what keeps the rifle from being canted? Seems to me the level can read leveled without the gizmo being clamped at 12:00 on the barrel,so to speak. What don't I understand? CL

3 STEP METHOD TROY

You level the rifle with the small level on the flat part of receiver or the scope base attatched. Then you level the level on the barrel. Then you go off level of barrel and level the scope.

Got it. Thanks. I use a similar method. Use a Level off the base, clamp rifle in tight as I can, then check the level on the bottom 1/2 of the ring (installed). Set the scope in the hopefully still level gun and lower half of the rings. Then set a level on the scope cap or adjustment dial AND compare the crosshairs with a level parallel line on the wall on the other side of the garage. Hopefully somewhere in there its level. CL
 
Boy I feel old reading this since I was taught to use a machinist square with a spirit level. Square and level the rifle in a vise, check the rings to see if they are machined square which most are not. Place the scope in the rings and tighten with light friction so as to be able to turn and slide for eye relief. Take off turret caps and place the square on top and turn scope till level then snug scope screws and check for level while tightening. I like rings with 4 screws so I can torque them with out turning the scope off level.
 
I use the Wheeler Level, Level, Level system. On a couple rifles, I really had to take my time
tightening down the rings while maintaining a level reticle.

Dale, I'm thinking this might be the issue you are having.

JD338
 
truck driver":9ltv5g5i said:
check the rings to see if they are machined square which most are not.

Most bases are worse than the rings. Using a base as your point of reference can often result in a crooked scope.

Finding a true level surface on a rifle is a challenge. I have gotten to only using allegedly level surfaces on a rifle as one additional point of reference and not as a primary.
 
As far as mounting the scope to the axis of the bore I wrote an article on this very subject that I use. I repost it below:

Ok, I'm not sure if this is new or old news, but it works very well for me and making sure I can hit exactly where I'm aiming if I've done everything else right, so here goes.

The scope should be mounted so the cross hairs are inline with the bore axis. Here's how to set it up so that as you dial into the elevation the bullet tracks correctly.

Have a known accurate load for the gun to do this test, and/or as accurate as the gun will hold at 100 yards/meters.

After mounting your scope and it is sited in, attach a large piece of cardboard at least 4' in length and mark a plumb line on it as long as you can in the middle. Place a mark, X or whatever 6" from the bottom on the plumb line drawn. Depending on whether your scope is in Mils, or MOA and the graduation of the scope come up 18" from that mark at the bottom and place another X on the plumb line, and one more 18" further up on the plumb line, the last one should be at 36" from your bottom mark. If you have a lot of turret adjustment range then you could go up another 18" but it is not necessary.

Note: This may need to be varied" IF" your scope does not have enough elevation range in your turret scope adjustment? If you don't have 36" of adjustment at 100 yards this will still work the same for setting up the scope, only your bullet will hit the cardboard further down from the upper most mark used.

Ok, here's what you want to do. Aim at the bottom X placed on the plumb line and fire one shot. It should be very close to the plumb line mark, either dead on, right or left but it wont really matter.

Aim and fire a 2nd shot at the bottom X only this time dial in 5 mils or 17.25 MOA into your elevation adjustment on the scope. The bullet hole should land on the same side and distance away from the plumb line as your first shot, or be dead center of the plumb line, either case it should be the same! And that is the important part!

Dial in another 5 Mils or 34.25 MOA and fire a 3rd shot while still aiming at the bottom mark you placed on the cardboard. Your bullets hole(s) should still be tracking the plumb line you marked and the same distance from that line drawn!

Ok, if you mounted your scope correctly and your round is accurate enough the bullet holes should be moving up the cardboard in a vertical line that is plumb (straight up and down). If the round fired at the bottom X mark is on the RIGHT side of the plumb line and the 2nd round is dead center and the 3rd is LEFT of the plumb line your scope will need to be turned Clockwise in your rings! Or Counterclockwise if the rounds fired are tracking Left to Right.

What your looking for is that as the adjustment(s) are dialed into your scope, that it tracks correctly up and down the plumb line drawn. If it doesn't, the amount needed is a very small turn clockwise or counterclockwise, and I mean very small unless you're way off.

Not only will this tell you if your scope is mounted properly inline with the bore, your scope should also be tracking correctly for the amount(s) of adjustments made. ie: 5 mils should change your POI 18" and so on.

This only needs to be done one time once successful. It is a trial and error method but this is the best way to make sure your scopes cross hairs are inline with the bore. Apply some masking tape with a line drawn on it to the rings and the scope so you can see the movement within the rings while turning.

This really only matters for extreme precision shooting as the distances become greater and greater. But you'll be happy you went through all this trouble in the beginning so as you begin your long range shooting your bullets are where they should be based on your dope.

Good luck.
 
I get pretty ignorant when mounting scopes, takes most of the day depending on how much beer is on hand
first I center the erector tube using a mirror
level the rifle
set the scope in the cradle
attach the top half of the rings
start the screws, make sure as they are snugged up the rings are drawled up even
put the reticule on a plumb line and tighten the ring screws
now check the tracking
put the reticle on the plumb line and turn the elevation stop to stop and see if the crosshair crosses the line, if it does, turn the scope a bit in the rings
don't care if it looks crooked. just want it tracking straight up and down and dead nuts level left and right
RR
 
Back
Top