Pillar Bedding M70 Part 2

truck driver

Ammo Smith
Mar 11, 2013
7,207
740
Well I do believe I said there would be a sequel to this so here you go.
The 35 Whelen AI was up next and I had some time off from work last week so I broke it down filled the pillars to length and attached them to the action same as before in part 1.
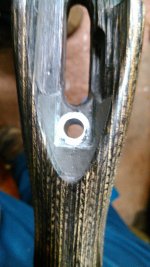
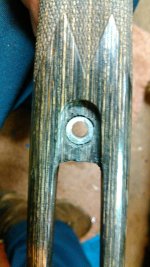
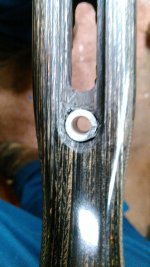
This time I didn't have to worry about the action alignment in the stock since it had already been factory bedded. So I drilled out the action screw holes with various size bits up to 17/32" to accommodate the pillars. took the Dremel tool and and roughed up the interior of the holes for a better lock and grip for the Devcon. Got to the recoil lug to remove the old bedding material used by the factory which was some kind of plastic glue like material that was semi soft and a real pain since it clogged the cutter bit and had to be cleaned frequently. Waxed and tapped everything up and decided to make this one a one step project. Yeah pillars and recoil lug all in one step.
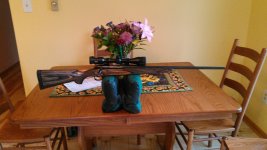
Here's some pictures and the dang area under the barrel shank still didn't come out the way I wanted it to but still good enough to support the barrel so I'll let well enough alone till I shoot it and see if there's a problem.
 

Attachments

  • KIMG0007.jpg
    KIMG0007.jpg
    401 KB · Views: 1,284
  • KIMG0003.jpeg
    KIMG0003.jpeg
    257 KB · Views: 1,284
  • KIMG0004.jpeg
    KIMG0004.jpeg
    266.1 KB · Views: 1,284
  • KIMG0005.jpeg
    KIMG0005.jpeg
    274 KB · Views: 1,284
  • KIMG0006.jpeg
    KIMG0006.jpeg
    271.6 KB · Views: 1,285
Thanks for the comments fellows.
Range time is coming just don't know when since the weather is crappy here. Drizzling rain and fog makes it hard to see the target clearly, but if I don't have to work Monday both new pillar jobs will be hitting the range since the weather is suppose to clear up some but will have wind to contend with which always shows up with a high pressure system. But if not maybe one day next week.
It's just funny how the epoxy goes everywhere except where you want it too sometimes.
I would like to know how some people seem to get a perfect looking bedding job every time? At least that's what all the pictures they submit show anyway.
 
Very nice work Roger, I am looking forward to your range report my friend!!

Blessings,
Dan
 
Love those laminate stocks! Pretty wood and as tough or tougher than the synthetics!! Looks like you did a nice job. I was hoping for some goo in the barrel channel for you to clean out! (y)
 
6mm Remington":17sn47qb said:
Love those laminate stocks! Pretty wood and as tough or tougher than the synthetics!! Looks like you did a nice job. I was hoping for some goo in the barrel channel for you to clean out! (y)
Thanks for the comments. I tried to get a better support area at the barrel shank but the epoxy didn't flow up the left side as far as it did the right when I put the action into the stock probably do to less clearance between the action and the wood. The epoxy always seeks the path of less resistance.
Since this was only the second time using Devcon 10110 I got a little more precise in measuring and mixing it. I also used a different mix ratio and it was runnier than the first time I mixed it and it set up harder making it more brittle and harder to clean up. But both mixes got real hard when set.
 
Nice work TD. I would love to bed my M70 to it's B&C medalist stock, but have never done it before. It's shooting just fine as is, so I'm leery to touch it. From what I've read and seen online, it seems like everything is in the prep work. Maybe I'll pick up a Boyd's stock for my 783 and experiment with that first before I attempt it on the B&C. Thanks for posting pics of your bedding jobs. Bret
 
BretN":31jvoryi said:
Nice work TD. I would love to bed my M70 to it's B&C medalist stock, but have never done it before. It's shooting just fine as is, so I'm leery to touch it. From what I've read and seen online, it seems like everything is in the prep work. Maybe I'll pick up a Boyd's stock for my 783 and experiment with that first before I attempt it on the B&C. Thanks for posting pics of your bedding jobs. Bret
Thanks Bret, form what I've read bedding a B&C Medalist is completely different than a wood or fiberglass stock since you already have a bedding block built into the stock. Ernie's has a kit for doing it and directions how. My advise is to read all you can on how to do it before you attempt it. It's not hard to do but you need to follow the instructions step by step.
 
Bret, I'd probably just bed the lug to tighten it up. Other than that I'd run it as is.
 
Did you remove any wood from the action? I'm getting my two stocks tomorrow and am getting the coarse of action together. Part of me wants to remove some material, (1/16-1/8) leave the pillars a little proud and bed the action...

Did you leave the bottom pillars flush with the stock?
 
Wyo7200":5xlhb4yx said:
Did you remove any wood from the action? I'm getting my two stocks tomorrow and am getting the coarse of action together. Part of me wants to remove some material, (1/16-1/8) leave the pillars a little proud and bed the action...

Did you leave the bottom pillars flush with the stock?
Wyo7200, I left the wood alone when I bedded the pillars because you need a flat surface to start with the same way with the tang area it keeps the action square in the stock and doesn't allow it to tilt, at least that is what I read. I bedded the pillars first and then removed wood after the epoxy set so the action was stable. Some will pillar and bed all at the same time but you need to leave enough wood so the pillars are flush with the stock from what I read. I also wrapped electrical tape around the barrel where it would rest near the end of the forearm so it would maintain the free float clearance but you still want clearance so two or three wraps is all you need depending on your barrel channel. Also if you choose to remove wood after you pillar 1/8" is about all you need. But the choice is yours.
 
Wyo7200":i7cou5h6 said:
Thanks for the info. Should be fun :)
Your welcome.
I would like to tell you that I did use two different size drill bits for the final hole for the pillars. The recommended bit size is 17/32" which I used for the 35 Whelen AI. For the 7RM I used a 9/16" bit since the inletting wasn't square with the barrel channel and wanted some wiggle room to get things to align better. 1/32" doesn't sound like much but I can tell you it does make a difference and allows you to use more epoxy on the pillars and wiggle the action around a good bit. With the 17/32" action holes I tapered both ends of the holes and were hour glass shaped, again that was my preference and is not needed. I also used a dremmel tool to rough up the inside of the holes cutting grooves in them to get better lock for the epoxy.
Enjoy the project it was fun for me though I get a little tense every time for fear of gluing one to the stock permanently. Use plenty of release agent and go over everything two or three times. (y)
 
I've tagged the threads for reference and saw the two sizes. Thanks for the write-ups. I got the unfinished walnut for the .260 Rem and coyote laminate for the T/C 22-250.

I'm thinking about attempting to do my own checkering so the bedding might be done a few months down the road. It'll also give the raw ebony for the tip some time to dry out. Fancy it up a little bit.

I did a practice run on an SPS varmint stock. Not the greatest platform to judge technique but did learn a few things.
 
has anyone used devcon 10610 ? it seems everyone uses 10110 . is there a difference that the aluminum won't work for bedding ? I have a partial can of 10610 . I need to check to see if it's still any good . a buddy gave it to me a quite a while ago . I've never used the stuff .
 
Back
Top