I have a Rock Chucker and followed the video on how to set up the die. For the first 100 or so .223 I have maybe 20-25 casings with case head separation. Had to take die out and reset it again and now 100 percent of casing show head separation. Have watched some videos on setting the dies and am very very new to this and some of it goes over my head. The videos seem like they are made for people who already pretty much know reloading well. I do not. Some help would be nice
Navigation
Install the app
How to install the app on iOS
Follow along with the video below to see how to install our site as a web app on your home screen.

Note: this_feature_currently_requires_accessing_site_using_safari
More options
You are using an out of date browser. It may not display this or other websites correctly.
You should upgrade or use an alternative browser.
You should upgrade or use an alternative browser.
Case head seperation problem
- Thread starter sgish7
- Start date
TackDriver284
Handloader
- Feb 13, 2016
- 2,472
- 1,911
I assume the brass is new since you mentioned " the first 100 ". May I ask what kind of die you used and which brass? I predict that its excessive headspace that caused those separations. Are you using powder charges within the minimum and maximum window for your rifle? Are the brass new?
The way I adjust my dies to use new brass, raise the shellholder to the top of the press stroke, screw in the die until it touches the shellholder, lower the shellholder and screw the die in about 1/16th of a turn and raise the shellholder again until it cams over a little and that will take some play out, tighten the lock ring and size your " new " cases with lube on them. I will adjust my dies again after the brass are fired 1 X. I use a headspace gauge (remove the spent primers first) then check your headspace on the fired case and write the measurement down, after cleaning your fired brass of carbon, lube and size the case and check the headspace measurement and you want about .002-.003" headspace less than the fired brass headspace. Example, your brass measures 2.345" and you want .003" headspace and the measurement you need is 2.342", if the adjustment you made is not enough, then you unlock the locking ring, and screw in the die very little at a time, and tighten the ring, and resize until you get to the 2.342" headspace.
Can you tell us how you adjusted your dies? There are lots of folks here with expertise to help with your issues.
Welcome to the forum.
Last edited:
ElmerThud
Handloader
- Jul 16, 2011
- 803
- 108
Resizing cases to SAAMI/CIP spec (Especially in older rifles) is usually way too much work on the brass. Get a headspace measurement guage as TackDriver284 says & measure your 'Fired case' headspace dimension (With fired primer in) . Measure several fired cartridges & use the average dimension to set your sizing die up. When you resize the case shoulder bump should not be greater than .003" - less is better. Good luck ")
Last edited:
- Thread starter
- #5
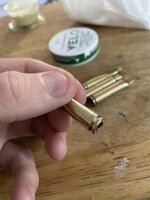
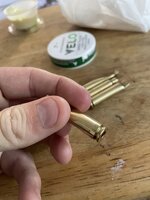
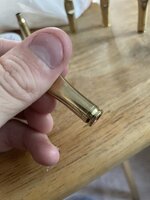
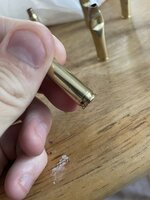
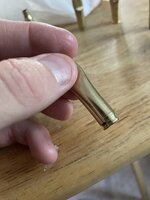
It’s been so many years I believe they are once fired. I will post pictures later today.
It’s an RCBS Die. I’m not sure the brass manufacturer. These are factory ammunition so I’ve never loaded my own powder charger into them. I haven’t gotten that far yet in my reading journey.
The way I adjusted it was raise them shell holder all the way up. Tighten the die till it touches then lower the shell holder and go down another 1/8-1/4 turn and lock it in
RL338
Handloader
- Mar 23, 2017
- 3,085
- 4,940
When I read this the first thing I’m thinking is under lubed cases that the rim is being pulled off in the shell holder. Pictures would be helpful in this situation.
- Thread starter
- #8
These should be once fired factory ammo. It’s nee been so long though I can remember. Yes full length resizing die. No they have not been loaded again. Just resized and had the primers knocked outif I got this right ;
you're saying the cases show head separation after the first fire , and this is factory ammo . you ran them through a full length resizing die , but did not load them .
- Thread starter
- #9
If anything I over lubed possiblyWhen I read this the first thing I’m thinking is under lubed cases that the rim is being pulled off in the shell holder. Pictures would be helpful in this situation.
- Thread starter
- #10
- Thread starter
- #11
- Thread starter
- #13
- Nov 4, 2004
- 24,852
- 7,694
If you bend a paper clip at the end 90° to form a "L", you and use it as a feeler to detect inner wall cracking or weaker thin spots in the brass.
JD338
JD338
- Thread starter
- #16
TackDriver284
Handloader
- Feb 13, 2016
- 2,472
- 1,911
If you have a headspace gauge, if you can find a good factory fired case and check the headspace on it and check the headspace on the unfired factory round. I am curious on the headspace. If you dont have one, here is a good headspace tool. https://www.hornady.com/headspace-bushings#!/
- Thread starter
- #18
First get box of new factory ammo and shoot them. If the fresh factory ammo shows the same problem before setting up the die, then the problem lies with the firearm. This will eliminate any question of whether the brass is once fired or maybe something else. Then follow the instructions I posted.
This is how I set up my sizing die for bottleneck cartridges.
1. Take a once fired factory round and blacken the neck and shoulders with a Magic Marker or Sharpee pen. Some people like to smoke the neck and shoulder, but I find the Magic Marker/Sharpee pen a bit better.
2. Carefully lubricate the case.
3. Loosen the lock ring on the sizing die and back off about two turns from when the die is set to touch the shell holder.
4. Size the case. Note where the marks are on the case and turn the die down about a half a turn and size again. Turn down some more, and resize again. What you are looking for is the marks on the blackening just touching the shoulder.
5. Clean the lube from the case and try it in the rifle. It may chamber just a bit on the snug side. If so, turn the die down ever so slightly, lube and size again. Wipe off the lube and try in the rifle. If it slides in as easily as a factory round, you should be good to go. If not, usually one more very slight adjustment should fix the problem.
6. Tighten the locking ring for the die and you're done. You have just set your sizing die up for a custom fit to your specific rifle, rather than a generic one size fits all guns.
Paul B.
salmonchaser
Handloader
- Dec 13, 2013
- 4,862
- 4,542
My 300 HH dies were doing that when I full length resized. Chucked it in a lathe and with finger pressure and some fine paper took away the machining bur.
You might also try raising the die a quarter turn, see if the problem goes away and you can still chamber the round.
You might also try raising the die a quarter turn, see if the problem goes away and you can still chamber the round.
Similar threads
- Replies
- 4
- Views
- 403