Headspace Problem???

M7025-06

Beginner
Jun 28, 2014
222
0
This kind of piggybacks off of my 117 gr Sierra Pro Hunter thread from earlier today. Bare with me...this might get a little long.

I had 2 rounds that would not chamber...couldn't close the bolt. I was using 2-fired Hornady brass that was ran through my FL die, but the shoulders weren't touched. Each piece of brass chambered in the rifle prior to loading.

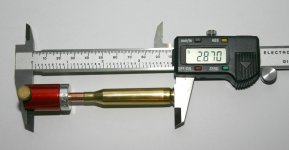
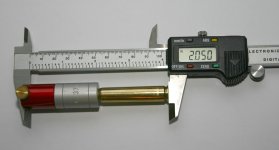
As for the bullet...measurement to the lands was taken with a Hornady OAL gauge. I took 3 measurements with the same bullet and came up 2.768'' (measured to the ogive). So I subtracted 0.030'' off of that to and that's what I loaded everything too (2.738'').

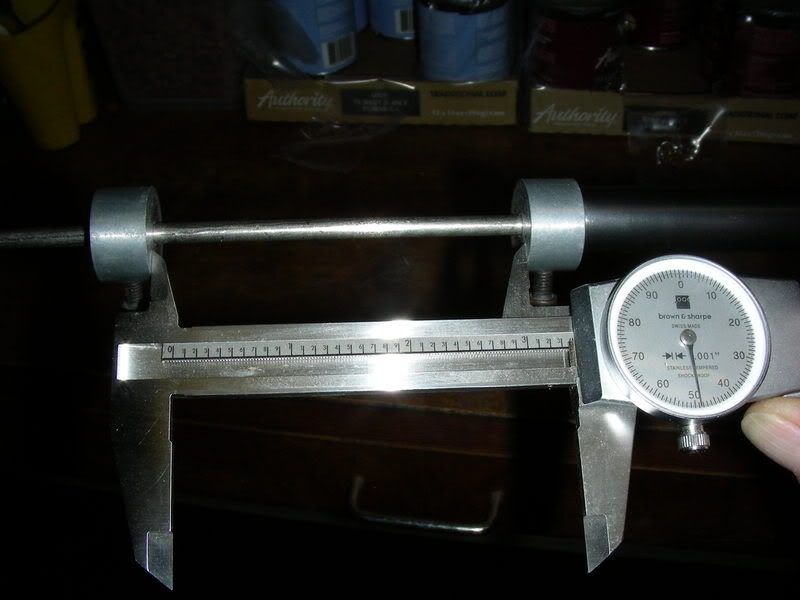
Jump ahead to this afternoon...I pulled the 2 rounds that wouldn't chamber and started taking measurements. The brass was 2.485'' (good) and the measurement with my Hornady headspace gauge was the same as the rest of the brass that chambered (2.642'').

So I decided to check the measurement to the lands again and about fell over when I saw the number...2.678''. That's 0.090'' into the lands. I have a hard believing a guy can close the bolt with that much of a crush into the lands without using a hammer. I tried 3 or 4 different bullets and they all read the same.
*Side note...I just took another reading and got the same as the original # (2.768''). I blackened out the neck of the OAL gauge case and it looks like it is rubbing against the chamber at the very top of the case neck. I'm wondering if this rifle has a short or tight chamber.

Can anyone give me a clue as to what's going on here? I had no signs of pressure at the range. Primers were still rounded, bolt lift was fine...nothing. I'm sure I left out some pertinent info, but this has got me baffled. Do I need to get this rifle to a gunsmith?

Any help would be appreciated.
 
Just guessing but the Hornady gauge has a reputation for losing accuracy with use because of a plastic bushing. Just what I read. I do not have a Hornady gage. I use a dial micrometer on a metal gauge block (RCBS) to measure headspace and length.
 
I would think there is enough leverage to actually spin the case on the bullet while turning the bolt. Did you run any of these through the rifle after loading. You might find the bullet would actually stay in the barrel and you end up with powder everywhere when you try to cycle the bolt.
 
For some reason I didn't try chambering them after they were loaded. When I ejected the round at the range there were rifling marks on the bullet.

Just throwing this out there...could this be an issue of the necks needing turned down? Is it possible the chamber is just tight enough to not allow some brass to fully chamber and others not? The only reason I ask is it looks like I'm getting some contact with the OAL gauge casing.
 
I have noticed in my own rifle loads, particularly those with a compressed powder charge, that the bullets will creep out of the case necks over time if I am not alert to this problem?
 
Try verifying your measurement via a second method I.E. use a fired case and crimp one edge and set a bullet in the case just enough to get it to stay. Color the ogive and bearing surface of the bullet with a dark marker. Chamber the round and then unload. The rifling will set the bullet back into the case. Don't worry if the bullet sticks - just tap it out. reset bullet according to the marks made on the bullet by the case. Measure and repeat three times. Compare this to your other measurements. I use this method with every bullet/cartridge combination and it is very consistent.

Scott
 
If I try to partial FL size a case for my M700 it will not chamber after sizing. Even with cases that would chamber after firing. So I set my FL die to just touch the shoulder with a minimum amount of setback and they chamber everytime.
I do have a tight chamber in that rifle and my theory is when I partial resize it displaces some brass and moves the shoulder forward a small amount.
I noticed you said you were not touching the shoulder when you resized. Maybe something similar is going on with your rifle.
 
One method to determine your chambers headspace using fired cases from your rifle is by marking the shoulder and neck of the case with a black marker and continuing to screw the FL sizing die down, resizing the case until the bolt will just close snugly or what's considered a slight crush fit. Then measure the cases OAL to the shoulders datum with a headspace comparator gauge to determine your chambers headspace length. Subtract .002" of an inch, screw your die in ever so slightly further until you get to that consistent OAL measurement for a slight shoulder bump and ease of chambering. The type of case lube and how much you use of it will have a slight effect on the final dimension.
There's another method that's more involved using virgin brass.
To the OP, if I read your post correctly what may have happened to you is that when making your initial OAL to the ogive measurements, the bullet may have slightly stuck in the rifling when seating the bullet/case combination and then came unstuck, subsequently pulling the bullet slightly out but still remaining seated in the case when extracting the case/bullet combination giving you a false reading.
Additionaly, when you mention "OAL gauge case" in your post are you referring to the threaded primer pocket Hornady case made for the comparator guages?
Muleman is right on point..... Use a fired case from your chamber, slightly crimp the edge to snugly hold a bullet, chamber and gently close the bolt. The bullet will often come out with the case and not stick in the rifling if you do this process slowly and GENTLY. Measure several times as he mentioned to verify its the same every time and go forward.

Best,
BD
 
This may seem like a dumb question but when was the last time you cleaned your sizing die? A dry expander ball or carbon build up on the expander ball could be stretching the case necks enough to cause a problem.
 
muleman":gfleway6 said:
Try verifying your measurement via a second method I.E. use a fired case and crimp one edge and set a bullet in the case just enough to get it to stay. Color the ogive and bearing surface of the bullet with a dark marker. Chamber the round and then unload. The rifling will set the bullet back into the case. Don't worry if the bullet sticks - just tap it out. reset bullet according to the marks made on the bullet by the case. Measure and repeat three times. Compare this to your other measurements. I use this method with every bullet/cartridge combination and it is very consistent.

Scott

Thought about this last night. I used to use this method before I got the OAL gauge, and it's a good idea.
 
Thanks for all of the advice everyone. I do appreciate it.


Oldtrader3":kbeiiiw3 said:
I have noticed in my own rifle loads, particularly those with a compressed powder charge, that the bullets will creep out of the case necks over time if I am not alert to this problem?

The loads weren't compressed. I always like to shake each round after the bullet is seated to check.

Darkhorse":kbeiiiw3 said:
If I try to partial FL size a case for my M700 it will not chamber after sizing. Even with cases that would chamber after firing. So I set my FL die to just touch the shoulder with a minimum amount of setback and they chamber everytime.
I do have a tight chamber in that rifle and my theory is when I partial resize it displaces some brass and moves the shoulder forward a small amount.
I noticed you said you were not touching the shoulder when you resized. Maybe something similar is going on with your rifle.

I think it is. I'm not a gunsmith (far from it), but I'm thinking my rifle has a tight or short neck...if that's even possible.

BD1":kbeiiiw3 said:
One method to determine your chambers headspace using fired cases from your rifle is by marking the shoulder and neck of the case with a black marker and continuing to screw the FL sizing die down, resizing the case until the bolt will just close snugly or what's considered a slight crush fit. Then measure the cases OAL to the shoulders datum with a headspace comparator gauge to determine your chambers headspace length. Subtract .002" of an inch, screw your die in ever so slightly further until you get to that consistent OAL measurement for a slight shoulder bump and ease of chambering. The type of case lube and how much you use of it will have a slight effect on the final dimension.
There's another method that's more involved using virgin brass.
To the OP, if I read your post correctly what may have happened to you is that when making your initial OAL to the ogive measurements, the bullet may have slightly stuck in the rifling when seating the bullet/case combination and then came unstuck, subsequently pulling the bullet slightly out but still remaining seated in the case when extracting the case/bullet combination giving you a false reading.
Additionaly, when you mention "OAL gauge case" in your post are you referring to the threaded primer pocket Hornady case made for the comparator guages?
Muleman is right on point..... Use a fired case from your chamber, slightly crimp the edge to snugly hold a bullet, chamber and gently close the bolt. The bullet will often come out with the case and not stick in the rifling if you do this process slowly and GENTLY. Measure several times as he mentioned to verify its the same every time and go forward.

Best,
BD

I'll give that a shot this morning too.

Yep...the case that threads onto the stick with the plunger. I don't think it was the bullet because I had to tap it out of the chamber. 9 time outta 10 (for me), the bullet usually gets stuck in the rifling. I'm gonna try Muleman's method

truck driver":kbeiiiw3 said:
This may seem like a dumb question but when was the last time you cleaned your sizing die? A dry expander ball or carbon build up on the expander ball could be stretching the case necks enough to cause a problem.

They get cleaned fairly often. I'll give mine a wipe-down just to cover all of my bases.
 
Ok...checked on a few things this morning.

First thing I did was establish my OAL to the lands using the method suggested by Muleman. I used a case that would chamber freely and the right length (2.084'' +/- a couple 0.001''). I took 5 readings and the average was 2.765''. That's only 0.003'' shorter than the original number.

Next thing I did was measure a handful of fired (not prepped) cases with the headspace gauge and see if they would chamber. Anything at 2.043'' would chamber with a crush fit. 2.042'' would chamber with no effort...anything 0.0005'' over 2.043'' would not chamber. I blackened out the shoulder and neck of a case that would chamber and one that wouldn't to see if there was a rough spot or something out of whack in the chamber, but I didn't find any marks.

One weird thing I discovered...I pulled the 2 cases apart that wouldn't chamber yesterday and dropped them in the rifle...the bolt closed fairly easily. Those measured 2.042'' with the headspace gauge. I can't figure out why those 2 rounds had the bullet up into the rifling when the other 20 were fine. Unfortunately I threw the 2 bullets back in the box without putting a caliper to them. I'll definitely make sure all of my reloads chamber in rifle before leaving the house next time...lesson learned.
 
If your modified case is rubbing in the chamber and you did not push it hard into the chamber to seat entirely, then you would have gotten the longer OAL measurement

Measure the OD of a neck on FIRED UNSIZED brass and that will give you your dimension of your chamber neck (add .001" for springback)

Example if your brass neck measures .337" then add .001" for a chamber neck of ~.338" (springback can vary)

THEN measure the OD of your modified case to see if it is too large. I have to outside turned the modified cases for my tight necked custom chambers in order for them to seat properly
 
woods":2uv2z4iv said:
If your modified case is rubbing in the chamber and you did not push it hard into the chamber to seat entirely, then you would have gotten the longer OAL measurement

Measure the OD of a neck on FIRED UNSIZED brass and that will give you your dimension of your chamber neck (add .001" for springback)

Example if your brass neck measures .337" then add .001" for a chamber neck of ~.338" (springback can vary)

THEN measure the OD of your modified case to see if it is too large. I have to outside turned the modified cases for my tight necked custom chambers in order for them to seat properly

Fired Hornady brass (took measurements at the top of the neck & where the neck & shoulder meet):

Top of Neck: 0.286''+0.001= 0.287''
Neck-Shld: 0.291''+0.001= 0.092''

Modified Case:
Top of Neck: 0.285''
Neck-Shld: 0.288''

Case that wouldn't chamber yesterday (prepped / unfired):
Top of Neck: 0.281''
Neck-Shld: 0.282''

The numbers look ok too me, unless I'm missing something.
 
If I might offer up another thought to consider it would be make your own comparator gauges from cases fired in your chamber. The OAL to the ogive of the bullet will measure a little differently between the two cases because the Hornady case is unfired and not headspaced to your chamber and throat. You are in reality pushing an unfired case deeper into the chamber using the tools case holder and rod than you are by chambering normally.
 
BD1":1bk2d223 said:
If I might offer up another thought to consider it would be make your own comparator gauges from cases fired in your chamber. The OAL to the ogive of the bullet will measure a little differently between the two cases because the Hornady case is unfired and not headspaced to your chamber and throat. You are in reality pushing an unfired case deeper into the chamber using the tools case holder and rod than you are by chambering normally.

Yeah...I think I'll go back to using the fired-case method from now on.

When I got the shorter measurement I mentioned yesterday, it felt like the modified case "slipped" into the chamber a little more than the previous time.
 
There is another method that will be easier and perhaps more accurate. You can use a cleaning rod, dowel or purchase a premade rod like I use. To illustrate the process I will show my tool from R-P Products, 318-424-7867 r_reeves61@bellsouth.net , just $25.00 when I bought mine years ago

It is a stainless rod with 2 lockable collets shown here with the Hornady tool

reevestool002.jpg

reevestool006.jpg


You just insert down the muzzle to the bolt face (make sure the firing pin is retracted) and lock the outermost collet

DSCN0760.jpg


Insert your bullet into the lands and hold with a pencil, dowel or the Hornady tool, insert the tool down to the bullet tip and lock the innermost collet

DSCN0762.jpg


measure between the collets

DSCN0764.jpg


You can do the same thing with a wooden dowel or cleaning rod (make sure to flatten the tip of the jag) by marking and measuring between the marks. But measuring between the mark is not as accurate as measuring between 2 hard flat surfaces IMO.

With this method you don't have to worry about headspace on your modified case or purchasing a modified case for each caliber
 
woods":2nb1gwki said:
There is another method that will be easier and perhaps more accurate. You can use a cleaning rod, dowel or purchase a premade rod like I use. To illustrate the process I will show my tool from R-P Products, 318-424-7867 r_reeves61@bellsouth.net , just $25.00 when I bought mine years ago

It is a stainless rod with 2 lockable collets shown here with the Hornady tool

reevestool002.jpg

reevestool006.jpg


You just insert down the muzzle to the bolt face (make sure the firing pin is retracted) and lock the outermost collet

DSCN0760.jpg


Insert your bullet into the lands and hold with a pencil, dowel or the Hornady tool, insert the tool down to the bullet tip and lock the innermost collet

DSCN0762.jpg


measure between the collets

DSCN0764.jpg


You can do the same thing with a wooden dowel or cleaning rod (make sure to flatten the tip of the jag) by marking and measuring between the marks. But measuring between the mark is not as accurate as measuring between 2 hard flat surfaces IMO.

With this method you don't have to worry about headspace on your modified case or purchasing a modified case for each caliber

I've used the cleaning rod method before. It didn't work too bad, but you're right that measuring a couple of sharpie marks doesn't produce the most accurate results.

Thanks for the tip.
 
For cartridges that headspace on the shoulder....I measure like this:

To determine the correct head space in a rifle is a very useful piece of data and I do it this way:

Take a cartridge case that has been fired in the rifle you’re measuring and with the case unsized but the primer de-capped (Using a de-capping die). Using a head space measuring tool such as Hornady’s, http://www.hornady.com/store/Headspace-Gauges/ fitted onto your zero’d vernier and measure the fired case dimension:

Pic 1

Take the fired case and place it into your rifle breech/chamber. Then, using some paper or aluminium baking foil cut into small pieces, place the paper/foil as packing at the cartridge base and continue doing so, one piece at a time until the bolt will close down – but – with some feeling of tightness – an undesirable condition.
Do this as carefully & accurately as you can.
This will give you a ‘No-Go’ dimension. In other words, you now know when a cartridge is resized, it will not chamber correctly in your rifle.

Then repeating the process until the point where the bolt locks down smoothly with normal light resistance, remove the paper/foil cartridge with the packing in place, using the head space tool on your vernier, take the measurement. You now have a new measurement, which will be the correct head space dimension you should resize fired cartridge cases to.

Note down the Go/No-Go with the correct head space dimension you want to resize your brass to for future reference.

The above takes a little ‘messing about’ but the advantage of getting these dimensions correct and being able to utilise them to set your full length resizing die accurately is greatly beneficial.


Pic 2 & Pic 3

I set my full length resizing die to achieve my determined head space dimension as follows:

Die in press with rubber ‘O’ ring in place. DeCapping rod locknut adjustment.

Using a rubber ‘O’ ring under the die locknut, I screw the die into the press and with correctly lubed fired cases close down the die until the ram and die size cases to the correct head space dimension I have determined. (As illustration 2.050”) At this point the locknut is tightened up onto the rubber and the die firmly set in place in the press.

At the point the correct resizing to pre-determined head space dimension is achieved I then want to ensure the de-capping rod & expander ball are centralised in the die. I do this by slackening the lock nut at the top of the decapping rod and inserting a fired, correctly lubricated unsized case into the die. Then, as I lower the press ram, as soon as the first tension is felt from the expander ball entering the case neck, The decapping rod locknut is tightened. At this point the case is fully centralised in the full length resizing die.

Movement of the case head (base) is available in the shell holder permitting case centralisation within the die, so now, case resizing can begin.
This procedure also aids concentricity of neck to cartridge case body.


The shell holder in the press will allow sideways centralisation of cartridge to die.
The first couple of cases should measure out to the head space dimension you achieved and by placing an ink datum line on both die and press, lining up each time should be easy.

The rubber ‘O’ ring provides ease of pinch movement to turn/screw the die further in or out by small degrees to adjust correctly to achieve correct dimensions should the head space not be quite as desired. When you’re comfortable with the procedure, you will be able to very accurately achieve bumping back case shoulders with the very minimum of effort and to +/- .0005” tolerance.

Once this is done, resizing your fired cases should be pretty concentric and will work the brass considerably less than had you set up your re-sizing die utilising die manufacturers instructions. Also, your fired brass will always be full length resized tuned exactly to your rifle. Remember though, not all brass is necessarily ‘equal’, so slight adjustment of the die in/out may be required to maintain close tolerance of head space when re-sizing

Not difficult, but you need to have a proper head space guage to do it.


Bullet seating to consistent dimensions requires the use of a tool called a Comparator. Again, Hornady make such a tool that clamps on to a vernier and this combination then measures the dimension from the ‘Ogive’ of the bullet to the cartridge head (base).
The use of this kind of tool will give much more accurate dimensional readings allowing greater control when adjusting bullet seating depths. The additional consistency may be of great benefit in turning out consistent ammunition.
The photo shows the tool giving a comparator dimension rather than an actual COAL.

Pic 4
Illustrated is a .25-06Rem. Round with 110gn Nosler AccuBond bullet.

When seating the bullet into the cartridge case, it may also be helpful to halfway rotate the case in the press after the first seating tension is felt, then complete the seating. It is possible doing this will help maintain ‘bullet to case’ concentricity.
The longer the cartridge OAL, the more important doing this may be.
 

Attachments

  • .25-06 Comparator.jpg
    .25-06 Comparator.jpg
    267.9 KB · Views: 1,816
  • DeCap Locknut 001.jpg
    DeCap Locknut 001.jpg
    130.9 KB · Views: 1,816
  • .25-06 FL Die b.jpg
    .25-06 FL Die b.jpg
    341 KB · Views: 1,816
  • .25-06 Headspace 01.jpg
    .25-06 Headspace 01.jpg
    241.9 KB · Views: 1,816
Back
Top