Magazine binding in laminate stock

hunter24605

Handloader
Apr 30, 2016
2,389
3,683
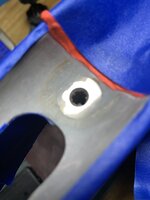
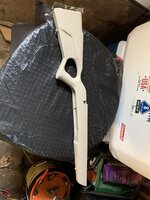
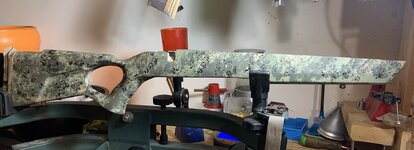
I picked up a used Boyd’s stock on eBay for a rifle I’m tinkering on. When I torque the action screws, at around 20 in-lbs the magazine jams against the bolt and will not lock in. I did some measuring and the Boyd’s is about .060” thinner where the action screws pass through the stock. Out of curiosity I placed 1/4” flat washers between the action and stock where the screws pass through and torqued to 35 in-lbs, the mag locks and it feeds fine and it’s solidly on the recoil lug. I’m planning on pillar bedding it anyway, couldn’t I just cut the pillars .060” past flush with the stock, so long as there’s still plenty of recoil lug engaging the action? And epoxy bed the action? It’s a 7-08. Also thinking .060" past flush isn't terribly much, and could probably due with just the pillars and epoxy, and not a full bed job.
 
Last edited:
What rifle action is it?
If your pillars are not flush I would want to bed the full action and recoil lug area
It’s a Win XPR I’m working up for my grandson’s first center fire. It’s already a sub MOA rifle, but he doesn’t like the factory stock, at all. The recoil lug is embedded into the stock and fits a notch in the action.
 
Last edited:
What rifle action is it?
If your pillars are not flush I would want to bed the full action and recoil lug area

I'm with Slim on this. Not to say I can't be wrong, but to me, you would not want all the pressure pin pointed on the pillars. That wont work in my view.

I'm guessing it is inletted properly at the rear tang and sits about like it should? If so the action and barrel is probably running down hill from there. It will add some weight because of the amount of bedding, but I'd level it up using tape on the barrel. Get the bottom of your gas relief vent sitting close to where it should be on the line of the stock. Depending how much bedding that is gonna take to fill the gap it's possible you might have to do it in more than one pour.
Thanks. Yep, it sits flush at the tang. Usually I use some fat rubber O-rings on the barrel to center and level it. I swear, sometimes it seems like if i go to change a light bulb, I'll end up having to replace the service panel LOL
 
Thanks. Yep, it sits flush at the tang. Usually I use some fat rubber O-rings on the barrel to center and level it. I swear, sometimes it seems like if i go to change a light bulb, I'll end up having to replace the service panel LOL

I've been there. For me it's always been rifles that were project rifles to start with, like a few M98's, so it taught me a lot when I needed to do basic things on other rifles to help them out. Don't know what you paid for the Boyds, but if not much, it might be easier to cut your losses and get a stock of your liking that fits properly the way it should, from the start.
 
I'm just going to go ahead and put the pillars in and then do a full bed on it, and see what comes of it. It only cost some spare time and a little Devcon. The stock was about 20% under retail of the base model stock, but it was factory cut with the LOP we were looking for, and custom LOP's add a little more to the cost. So I think it's worth trying, at least. But if it doesn't come out 100% right, it's going to the scrap heap.
 
Nothing wrong with giving it a try. I had to look up pictures of the action. You should be able to shim up the bottom of the recoil lug with tape to properly engage the action, then you won't have to worry if it gets stuck when you do the bedding.
 
Nothing wrong with giving it a try. I had to look up pictures of the action. You should be able to shim up the bottom of the recoil lug with tape to properly engage the action, then you won't have to worry if it gets stuck when you do the bedding.
I thought I’d have the guy a work cut a new recoil lug from stainless to the dimensions I need on the CNC Plasma table
 
Did the pillars and let the epoxy cure overnight and then scuffed it up and fully bedded the action. Ended up using Permatex Steel Weld Epoxy. It came out solid as rock. The red is a clay dam protecting the recoil lug groove. I have it masked off again thinking I would rough it up, and put a thin skim coat because there’s a few minor voids in the sidewalls that are about 1/32” . But not sure if they’ll matter. The discoloration of the epoxy around the pillar is just some brown shoe polish I used as a release agent on the action. Looks are deceiving, that discoloration makes it look like it’s not right, but it’s perfectly flush. They way I approached the recoil lug was to put a thin bead of JB putty on top of the recoil lug and after thoroughly lubbing the notch on the receiver, set it in place and let it sit for a few minutes and took it back apart. The JB left a thin bead on the lug to indicate the proper height of the new lug, which will be cut from stainless with a CNC plasma torch.
 

Attachments

  • 2463E2DA-AED8-4166-9376-FFBBFF14FBD2.jpeg
    2463E2DA-AED8-4166-9376-FFBBFF14FBD2.jpeg
    210.5 KB · Views: 11
I ordered a fairly expensive Boyd's for my 7-08 so I hope I have better luck than you. I have had a few and they were all great. If it's not perfect, I'll make it perfect.
I’ve ordered 2 from the factory and both were pretty much drop in and go. This one seems like it may an oddity.
 
After the pillars and bedding I put the new “taller” recoil lug in, and put it back together and went to the range with the 120 pro hunter load that was accurate in the factory stock. And it still shoots great, ignore the one that’s low and right, definitely shooter error. would love to find some 120 BT’s…. Then it was off to the shed for painting. I started with a flat sand color base coat, then sponged on a sage green, followed by moss green, the very sparingly black. I have to pick up some clear dead flat acrylic to coat, and it’ll be done. Most importantly is the grandson loves the fit and camo of the stock. And the 120 pro hunter should be dandy deer bullet for the 7-08 without a bunch of recoil. It’s been a frustration filled journey, but in the end it was worth it.
 

Attachments

  • C6B323EF-F24C-4D55-9001-2B5D85DE07FE.jpeg
    C6B323EF-F24C-4D55-9001-2B5D85DE07FE.jpeg
    512.9 KB · Views: 20
  • 37FCDB79-B41F-4C39-9E3C-244261982EF7.jpeg
    37FCDB79-B41F-4C39-9E3C-244261982EF7.jpeg
    480.5 KB · Views: 20
  • 3F3C6782-EF65-4310-AFF1-EE78D5F9F22D.jpeg
    3F3C6782-EF65-4310-AFF1-EE78D5F9F22D.jpeg
    228 KB · Views: 20
Last edited:
I swear, sometimes it seems like if i go to change a light bulb, I'll end up having to replace the service panel LOL
Yep, I hear ya' on this!

I am glad you had a good outcome to all of your work on this "simple" project. Dan
 
Back
Top